Creating a high-ticket dropshipping store on WordPress can be a game-changer for your eCommerce journey.
With higher profit margins, premium products, and the power of WordPress, you can build a profitable online store with ease.
In this guide, we’ll walk you through the process of setting up a high-ticket dropshipping store using WordPress and Woocommerce, choosing the perfect domain name with Namecheap, and setting up fast hosting with Nexcess or CloudWays.
We’ll also cover the best themes for your store and introduce the Sellvia Plugin for sourcing US-based suppliers.
Why Choose High-Ticket Dropshipping?
High-ticket dropshipping involves selling expensive items that have higher profit margins compared to low-ticket products.
This business model offers several advantages:
- Higher Profit Margins: Selling expensive items means you can earn more per sale.
- Less Competition: Fewer drop shippers target high-ticket niches, giving you a competitive edge.
- Better Customer Relationships: High-ticket items often attract more serious buyers, leading to better customer relationships.
Choosing Profitable High-Ticket Dropshipping Niches
Selecting the right niche is crucial for your high-ticket dropshipping store’s success. Consider these factors:
- Passion and expertise: Choose a niche you’re interested in or have knowledge about.
- Profit potential: Research products with high profit margins and demand.
- Competition analysis: Identify niches with less competition for better chances of success.
Some popular high-ticket dropshipping niches include:
- Luxury fashion and accessories.
- Electronics and gadgets.
- Home decor and furniture.
- Health and wellness products.
- Fitness equipment.
Step-by-Step Guide to Setting Up Your High-Ticket Dropshipping Store on WordPress
1. Choosing a Domain Name with Namecheap
Your domain name is your store’s online identity. Here’s how to choose and register a domain name with Namecheap:
Step 1: Brainstorm Domain Names
- Choose a name that reflects your store’s niche and is easy to remember.
- Use keywords related to your products or niche, such as “luxury” or “premium.”
Step 2: Check Availability
- Visit Namecheap’s website and use their domain search tool to check the availability of your chosen name.
- If your preferred name is taken, try variations or consider different domain extensions (.com, .net, .store).
Step 3: Register Your Domain
- Once you’ve found an available domain, add it to your cart and proceed to checkout.
- Complete the registration process by providing the necessary information and making the payment.
2. Setting Up Fast Hosting with Nexcess or CloudWays
Reliable and fast hosting is crucial for your dropshipping store. Nexcess and CloudWays are excellent options for hosting your WordPress site.
- Visit the Nexcess website and choose a hosting plan that suits your needs.
- Nexcess offers managed WordPress hosting, ensuring your site runs smoothly and efficiently.
- Follow the instructions to sign up and set up your hosting account.
- Go to the CloudWays website and sign up for an account.
- Choose WordPress as your application and select a cloud provider (e.g., DigitalOcean, AWS).
- Configure your server settings and launch your WordPress site.
3. Installing WordPress
Once you have your domain name and hosting, it’s time to install WordPress.
- Log in to your hosting account (Nexcess or CloudWays) and navigate to the control panel.
- Use the one-click WordPress installation feature to set up your site.
- Follow the prompts to complete the installation and access your WordPress dashboard.
4. Choosing the Best Themes for a Dropshipping Store
A professional and attractive theme is essential for your dropshipping store. Here are some of the best WordPress themes for dropshipping:
- Highly customizable with a drag-and-drop page builder.
- Optimized for WooCommerce, making it perfect for dropshipping.
- Lightweight and fast, ensuring quicker delivery times.
- Offers pre-built templates for WooCommerce stores.
- Elegant design with multiple layout options.
- Built specifically for eCommerce, making it ideal for high-ticket dropshipping.
5. Setting Up WooCommerce
WooCommerce is the most popular eCommerce plugin for WordPress. Here’s how to set it up:
Step 1: Install WooCommerce
- From your WordPress dashboard, go to Plugins > Add New.
- Search for “WooCommerce” and click “Install Now.”
- Activate the plugin once it’s installed.
Step 2: Configure WooCommerce Settings
- Follow the setup wizard to configure your store’s basic settings, including currency, shipping, and payment methods.
- Customize your product pages, checkout process, and other important settings.
6. Installing the Sellvia Plugin for US-based suppliers
The Sellvia Plugin is a powerful tool for sourcing products from US-based suppliers with fast shipping. Here’s how to install and set it up:
Step 1: Install the Sellvia Plugin
- From your WordPress dashboard, go to Plugins > Add New.
- Search for “Sellvia” and click “Install Now.”
- Activate the plugin once it’s installed.
Step 2: Connect to Sellvia
- Follow the prompts to create a Sellvia account and connect it to your WordPress site.
- Configure the plugin settings, including your store’s currency, shipping options, and pricing rules.
Step 3: Import Products
- Use the Sellvia dashboard to browse and import high-ticket dropshipping products.
- Ensure the products align with your niche and target market.
High-Ticket Product Examples
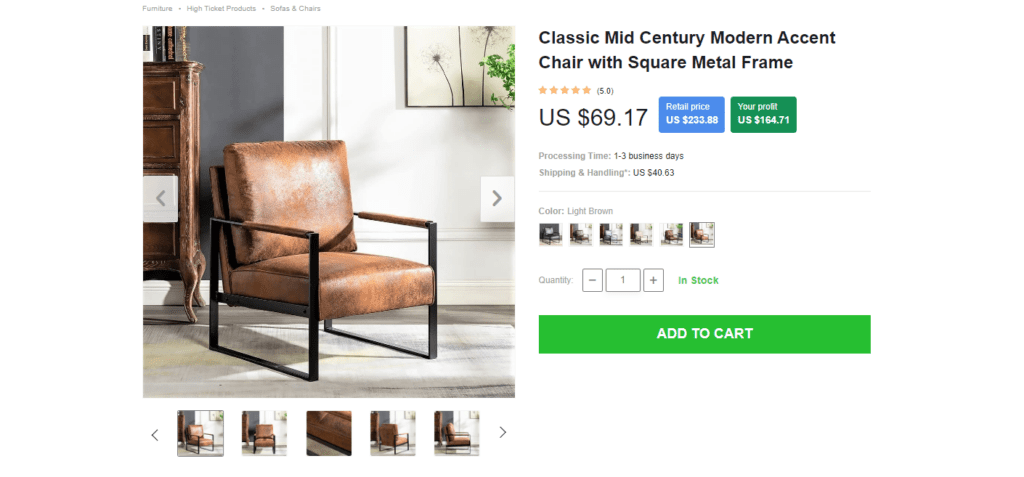
- Classic Mid-Century Modern Accent Chair
- You Pay $69.17 for the product.
- You Sell the product for $233.88.
- Your Profit is $164.71 Per unit.

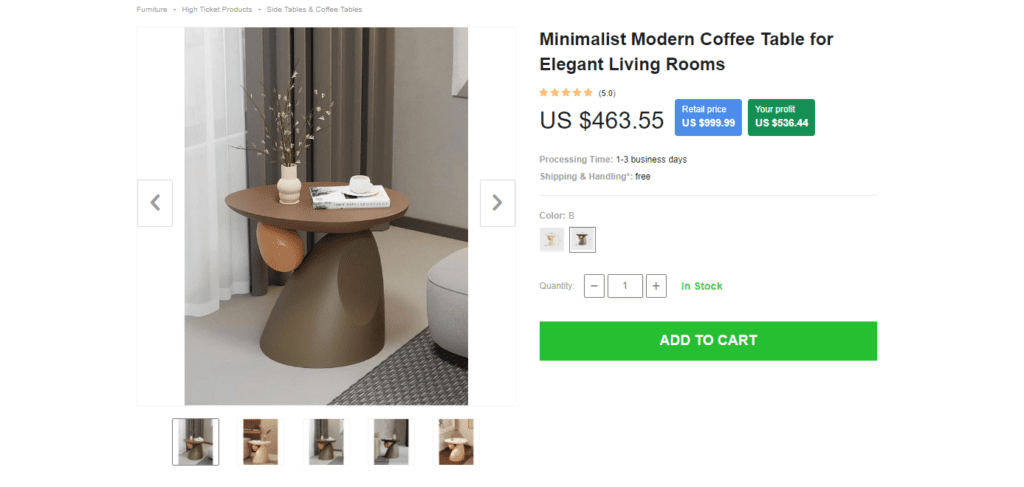
- Minimalist Modern Coffee Table
- You Pay $463.55 for the product.
- You Sell the product for $999.99.
- Your Profit is $536.44 Per unit.

Dropshipping Order Fulfillment with Sellvia
Sellvia handles order fulfillment efficiently, ensuring quicker delivery times and satisfied customers. This allows you to focus on marketing and growing your business.
Marketing Your High-Ticket Dropshipping Store
- Content marketing: Create valuable content to attract and engage your target audience.
- Social media marketing: Build a strong presence on platforms like Instagram and Facebook.
- Email marketing: Collect customer emails and nurture relationships.
- Paid advertising: Utilize platforms like Google Ads and Facebook Ads to reach a wider audience.
Sellvia provides you with all the tools you need to create compelling product listings. This includes high-quality product images that showcase your products from every angle, as well as detailed and persuasive product descriptions highlighting key features and benefits. To make promoting your products even easier, Sellvia also offers a range of marketing materials for each product, saving you valuable time and effort.
Conclusion
Building a successful high-ticket dropshipping store on WordPress is achievable with the right strategy and tools. By following this guide and leveraging the power of Sellvia, you can create a profitable online business. Remember, consistency, patience, and a customer-centric approach are key to long-term success.


